How }nstall }rn } Filter Complete Guide
Installing an iron filter improves your home's water quality significantly removing harmful contaminants affecting taste odor and appearance.
Understanding Iron Contamination in Your Water Supply
Before learning how to install a iron filter, it's essential to understand why iron removal matters. Iron contamination affects millions of households, causing reddish-brown stains on fixtures, metallic tastes in drinking water, and potential damage to plumbing systems and appliances.
Signs You Need an Iron Filtration System
Common indicators include:
- Orange-red staining on sinks, toilets, and bathtubs
- Metallic or bitter taste in drinking water
- Rust-colored sediment in glasses and containers
- Discolored laundry after washing
- Reduced water pressure from pipe buildup
Types of Iron Filters Available
When researching how to install a iron filter, you'll encounter several options:
Oxidation Filters
These systems use air or chemical oxidants to convert dissolved iron into solid particles, which are then filtered out. They're effective for moderate iron levels and require regular maintenance.
Water Softeners with Iron Removal
Some water softeners can remove small amounts of ferrous iron. However, they may not be sufficient for households with high iron concentrations.
Manganese Greensand Filters
These specialized filters use potassium permanganate to oxidize and remove iron. They're highly effective but require regular chemical regeneration.
Tools and Materials Needed
Before starting your iron filter installation, gather these essential items:
- Adjustable wrench set for plumbing connections
- Pipe cutter or hacksaw for modifying existing pipes
- Teflon tape for sealing threaded connections
- Pipe fittings matching your plumbing system (copper, PVC, or PEX)
- Bucket and towels for water cleanup
- Safety glasses and gloves for protection
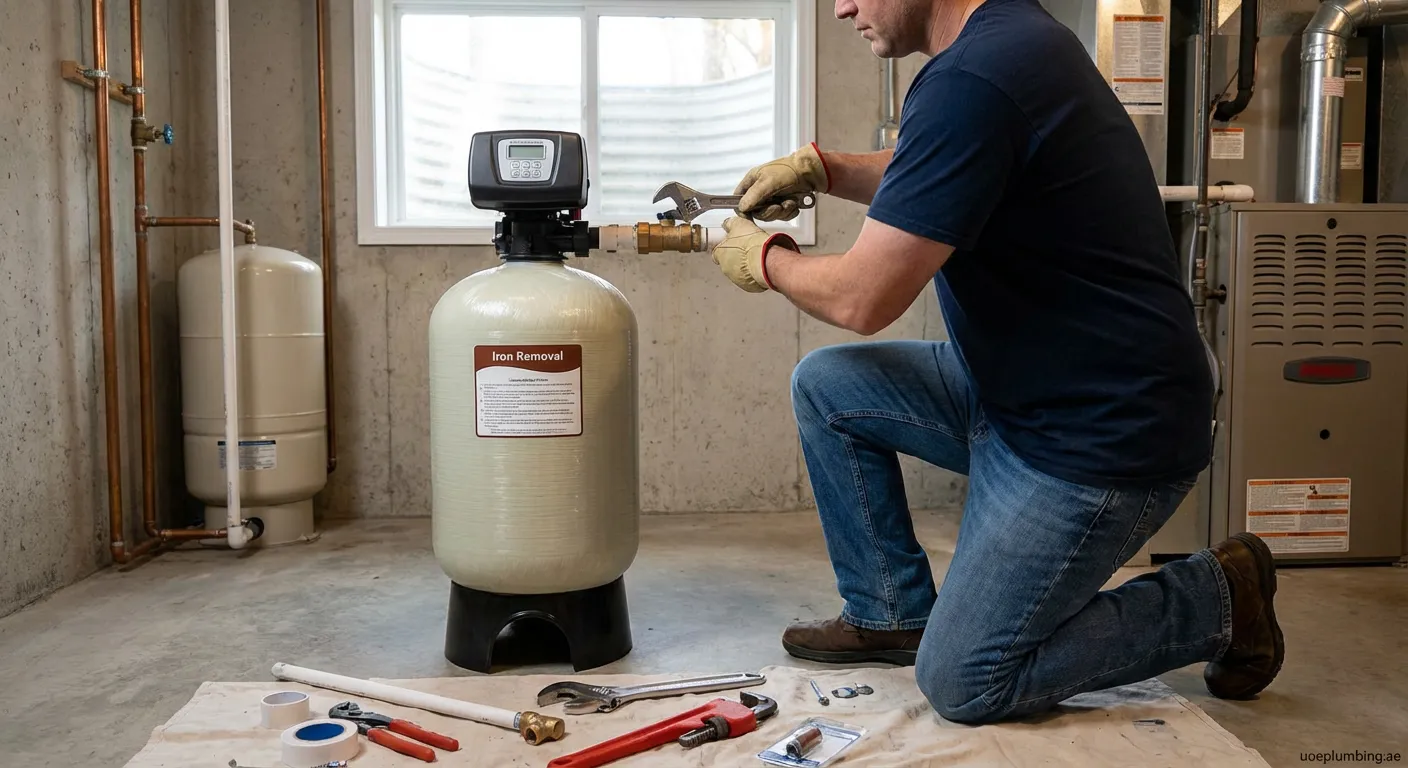
Step-by-Step Iron Filter Installation Guide
Step 1: Choose the Right Location
Select a spot near your main water line entry point, typically in the basement or utility room. Ensure adequate space for maintenance and proper drainage. The location should have access to electricity if your system requires it.
Step 2: Shut Off Water Supply
Turn off the main water valve and open faucets to drain remaining water from the pipes. This prevents flooding during installation.
Step 3: Cut Into the Main Water Line
Using your pipe cutter, create an opening in the main water supply line where the filter will connect. Install bypass valves if you want to maintain water access during filter maintenance.
Step 4: Install Inlet and Outlet Connections
Connect the filter's inlet port to the incoming water line and the outlet port to the line continuing into your home. Use Teflon tape on threaded connections to prevent leaks.
Step 5: Connect Drain Line
Most iron filters require a drain line for backwashing. Connect this to a nearby floor drain or utility sink following manufacturer specifications.
Step 6: Program the Control Valve
Set the backwash frequency based on your iron levels and household water usage. Higher iron concentrations typically require more frequent backwashing cycles.
Post-Installation Testing and Maintenance
After completing the iron filter setup, flush the system thoroughly and test your water quality. Regular maintenance ensures optimal performance:
- Check and replace filter media as recommended
- Monitor water quality periodically
- Clean control valves annually
- Inspect connections for leaks monthly
Understanding how to install a iron filter properly protects your plumbing investment and ensures cleaner, better-tasting water for years to come.
Enjoy Clean Filter Water
Learning effective procedures ensures successful installations delivering pure healthy usable liquids benefiting households daily Remember contacting our Toilet-repair Al Salama professionals assists homeowners handling diverse projects competently