How to Replace a Sink Drain Flange Easily
Is your kitchen sink leaking from the bottom? The culprit is often a corroded flange. Learn how to replace a sink drain flange quickly and save money on professional repairs today.
If you notice a puddle forming in the cabinet under your kitchen sink, the issue often stems from the drain assembly. A corroded or improperly sealed flange allows water to seep through the gap between the sink basin and the drain pipe. Learning how to replace a sink drain flange is a fundamental DIY skill that can save you significant money on plumbing bills.
Signs You Need to Replace the Flange
Before diving into the repair, ensure the flange is the culprit. Common indicators include:
- Visible Rust or Corrosion: Metal flanges can rust over time, breaking the seal.
- Putty Failure: Dried or cracked plumber's putty around the drain lip.
- Water Damage: Dampness directly underneath the drain connection point.
Tools and Materials Required
To successfully complete this project, gather the following items:
- Channel-lock pliers or a pipe wrench
- Flathead screwdriver and hammer (for stubborn locknuts)
- Plumber’s putty or 100% silicone sealant
- New sink drain assembly
- Old rags and a bucket
Step-by-Step: How to Replace a Sink Drain Flange
Follow these steps to ensure a watertight seal and a professional finish.
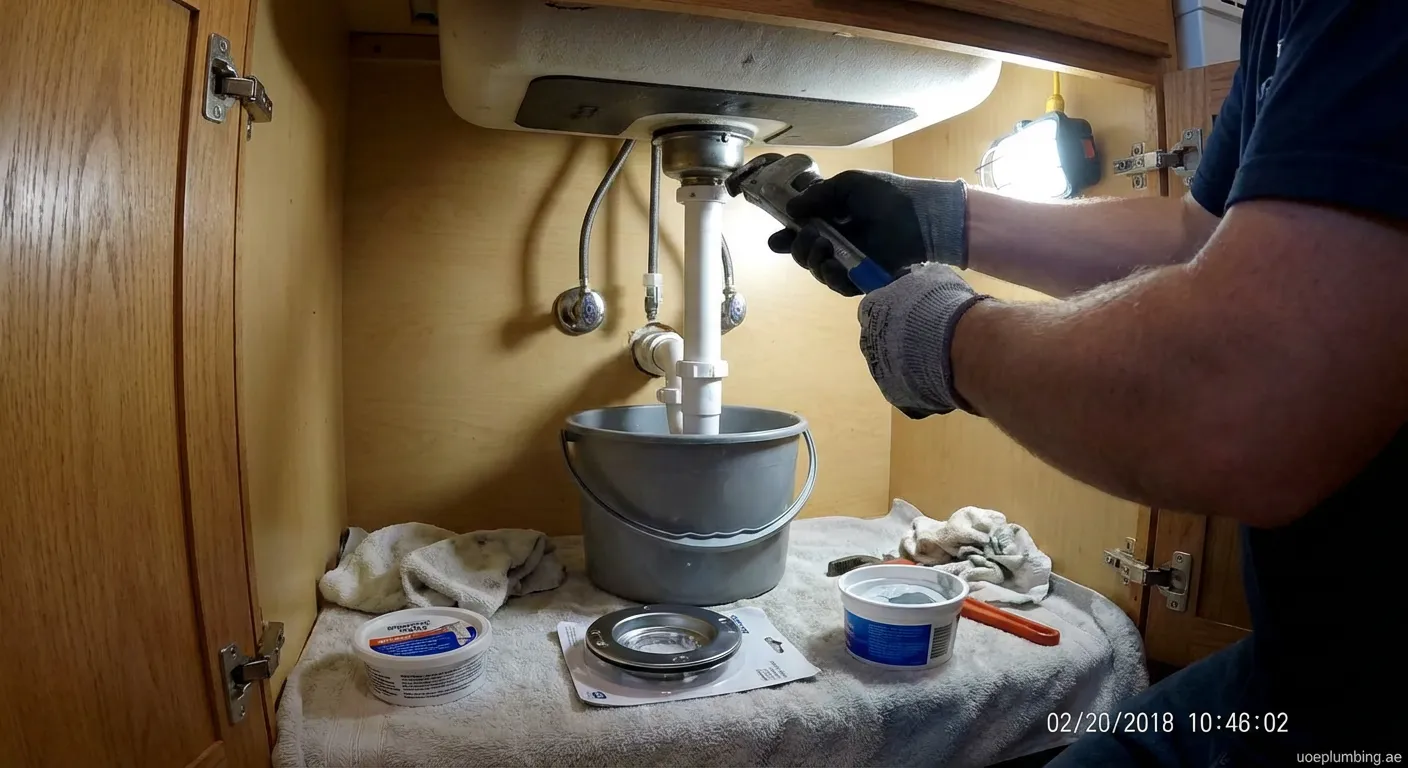
1. Disconnect the Drain Pipe
Place a bucket under the trap to catch residual water. Loosen the slip nuts connecting the P-trap to the tailpiece (the straight pipe coming down from the sink). Remove the P-trap carefully. If you have a garbage disposal, the process involves disconnecting the disposal unit from the mounting bracket first.
2. Remove the Old Flange
Under the sink, locate the large locknut holding the drain assembly in place. Use your pliers to turn it counterclockwise. If the nut is seized due to corrosion, tap it gently with a hammer and screwdriver to loosen it. push the drain assembly up through the sink basin to remove it.
3. Clean the Sink Surface
This is a critical step often overlooked when learning how to replace a sink drain flange. Scrape away all old putty and lime buildup from the drain opening. The surface must be perfectly clean and dry; otherwise, the new seal will fail, and leaks will persist.
4. Apply the Sealant
Take a golf-ball-sized amount of plumber’s putty and roll it into a "snake" or rope. Press this ring of putty firmly around the underside of the rim of the new flange. Note: If you have a granite or marble sink, use silicone sealant instead of putty, as the oils in putty can stain porous stone.
5. Install the New Flange
Press the new flange firmly into the drain opening. From below the sink, slide the rubber gasket and friction ring (cardboard or plastic washer) onto the threads. Screw on the large locknut by hand, then tighten it with pliers. As you tighten, excess putty will squeeze out inside the sink—this is normal.
6. Reconnect Plumbing and Clean Up
Wipe away the excess putty inside the sink. Reattach the tailpiece and P-trap, tightening the slip nuts securely.
Testing for Leaks
Once everything is reassembled, run water into the sink. Fill the basin slightly and let it drain while watching the connections underneath with a flashlight. If the area remains dry, you have successfully mastered how to replace a sink drain flange.
Regular maintenance and prompt repairs of your sink components ensure the longevity of your kitchen cabinetry and prevent mold growth.
Final Thoughts on Drain Repair
Replacing a flange is a manageable task that prevents water damage. If you prefer professional help, our team is ready. We also offer a specialized service for Pipe-repair The Thanyah 1 to ensure your plumbing system works perfectly.