How to Replace a Shower Head Holder: Complete Guide
Knowing how to replace a shower head holder saves you time and money on plumber calls. This common bathroom repair takes under an hour with basic tools.
Why You Might Need to Replace Your Shower Head Holder
A shower head holder secures your handheld shower in place. Over time, these fixtures can become loose, cracked, or corroded due to constant water exposure and daily use.
Common Signs It's Time for Replacement:
- Loose grip – The shower head won't stay in position
- Visible cracks – Plastic components have deteriorated
- Rust or corrosion – Metal parts are degrading
- Water leaks – Connections are no longer sealed properly
Tools and Materials Needed
Before learning how to replace a shower head holder, gather these essential items:
| Tool | Purpose |
|---|---|
| Adjustable wrench | Remove old fixtures |
| Plumber's tape | Seal threaded connections |
| Silicone sealant | Waterproof mounting areas |
| Screwdriver set | Access mounting brackets |
| Cleaning cloth | Prepare surfaces |
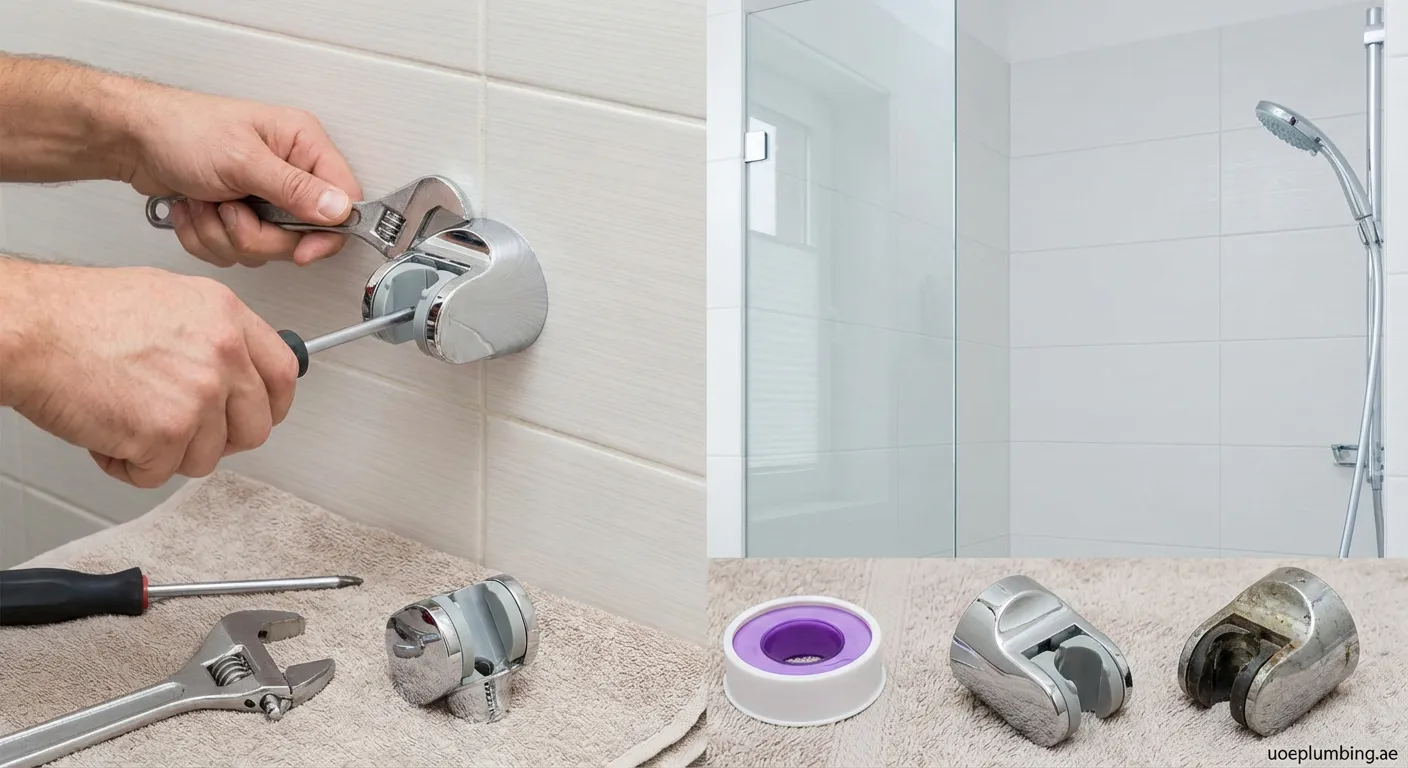
Step-by-Step Instructions
Step 1: Remove the Old Shower Head Holder
First, turn off the water supply to prevent unexpected spraying. Grip the shower head holder firmly and rotate counterclockwise until it detaches from the mounting bracket.
Pro Tip: If the holder is stuck due to mineral buildup, apply white vinegar and let it sit for 15 minutes before attempting removal.
Step 2: Disconnect the Mounting Bracket
Most shower head holders attach via a wall-mounted bracket held by screws or adhesive. Use your screwdriver to remove visible fasteners carefully.
For adhesive-mounted units:
- Apply heat using a hairdryer to soften the adhesive
- Gently pry the bracket away using a putty knife
- Remove residual adhesive with rubbing alcohol
Step 3: Prepare the Installation Surface
Clean the wall surface thoroughly before installing your new fixture. Remove old sealant, mineral deposits, and dirt that could compromise adhesion.
Step 4: Install the New Mounting Bracket
Position the new bracket at your desired height – typically 48-52 inches from the floor for optimal accessibility.
Mark screw hole locations with a pencil before drilling pilot holes into tile surfaces.
Step 5: Attach Your New Shower Head Holder
Wrap plumber's tape clockwise around threaded connections 2-3 times for a watertight seal. Screw the new shower head holder onto the bracket by hand first.
Use an adjustable wrench for final tightening – but avoid overtightening which can crack plastic components.
test test test test test test test test test
Troubleshooting Common Issues After Replacement
Enjoy Your Upgraded Shower Experience
Now you know how to replace a shower head holder successfully! Regular maintenance prevents future issues. For drain problems in Al Faseel South area? Drain-cleaning Al Faseel South offers professional assistance.