How to Install an Isolation Valve: Step-by-Step Guide
Knowing how to install a isolation valve is an essential plumbing skill for homeowners. This guide provides step-by-step instructions for successful valve installation.
What is an Isolation Valve?
An isolation valve is a crucial plumbing component that allows you to shut off water flow to specific fixtures without affecting the entire household water supply. Understanding how to install a isolation valve correctly ensures you can perform maintenance and repairs efficiently.
Types of Isolation Valves
- Ball valves - Quick quarter-turn operation, reliable sealing
- Gate valves - Traditional design, suitable for low-pressure systems
- Globe valves - Precise flow control, common in residential settings
Tools and Materials Required
Before learning how to install a isolation valve, gather these essential items:
- Adjustable wrench set
- Pipe cutter or hacksaw
- Deburring tool
- PTFE tape or pipe joint compound
- Isolation valve (correct size for your pipes)
- Bucket and towels for water drainage
Pre-Installation Preparation
Step 1: Shut Off Main Water Supply
Locate your main water shut-off valve and turn it clockwise. Open nearby faucets to drain remaining water from the pipes.
Step 2: Select the Installation Location
Choose a spot that provides easy access for future maintenance. The location should allow sufficient space for the valve handle to operate freely.
Installation Process
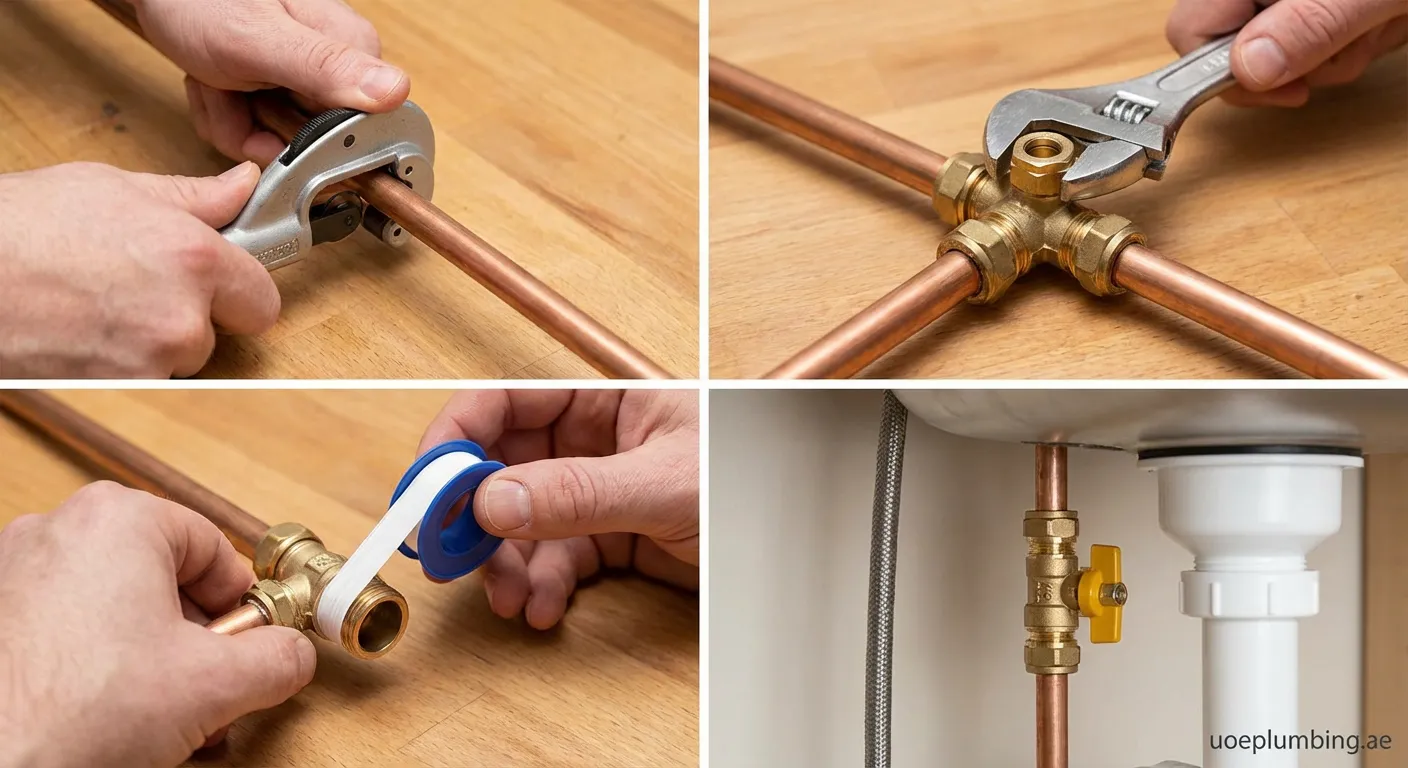
For Copper Pipes
- Cut the pipe at the selected location using a pipe cutter
- Clean and deburr both pipe ends thoroughly
- Apply flux to the pipe ends and valve fittings
- Solder the valve using lead-free solder
- Allow to cool completely before proceeding
For Plastic Pipes
- Cut the pipe squarely with a pipe cutter
- Clean the surfaces with primer
- Apply solvent cement to both surfaces
- Push the valve onto the pipe with a twisting motion
- Hold in place for 30 seconds
For Compression Fittings
- Slide compression nut onto the pipe first
- Add the compression ring (ferrule)
- Insert the valve onto the pipe end
- Tighten the nut with wrenches until secure
Testing Your Installation
After completing the isolation valve installation:
- Turn on the main water supply slowly
- Check for leaks around all connections
- Operate the valve handle several times
- Verify water flow stops completely when closed
Important: If you discover any leaks, immediately shut off the water supply and retighten connections or redo soldered joints.
Common Mistakes to Avoid
- Over-tightening compression fittings can damage pipes
- Insufficient cleaning leads to poor connections
- Wrong valve size causes installation difficulties
- Forgetting to drain pipes results in messy installations
Maintenance Tips
Regular maintenance ensures your isolation valve remains functional:
- Exercise the valve quarterly by opening and closing
- Check for corrosion or mineral buildup
- Replace worn washers or O-rings promptly
- Keep the area around the valve accessible
Ready for Your Project?
Mastering how to install a isolation valve empowers you to handle plumbing maintenance confidently. Follow these steps carefully for a professional result. If you need professional assistance, we also offer expert pipe repair services in Hadaeq Sheikh Mohammed Bin Rashid Pipe-repair Hadaeq Sheikh Mohammed Bin Rashid.