


 Licensed
 All Dubai
 Plumbing Guides
How to Install a Heavy Metal Filter: Full Guide
 Mark Anderson
 Nov 12, 2026
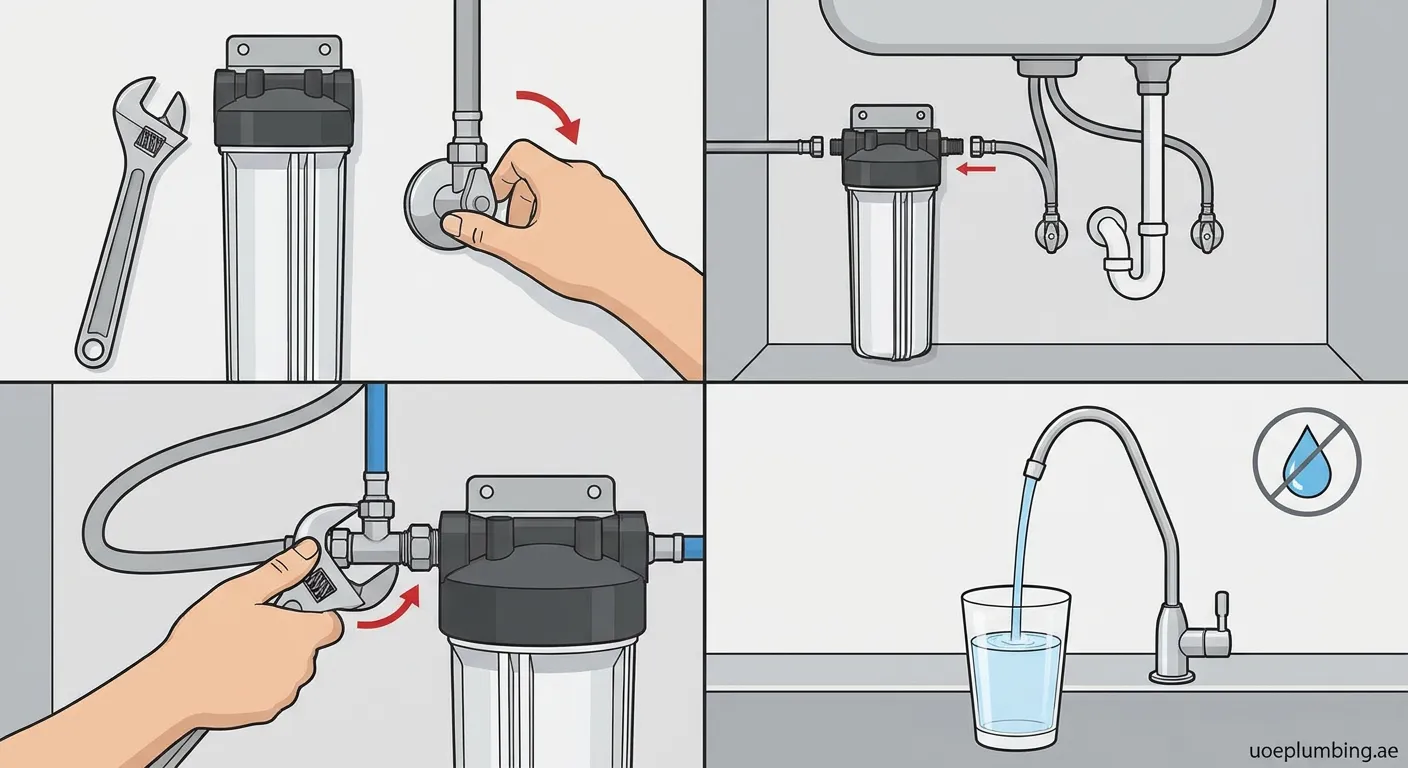
Heavy metals like lead and copper pose serious health risks. Discover how to install a heavy metal filter properly to safeguard your household water supply and ensure pure, safe drinking water.
Why Install a Heavy Metal Water Filter?
Contaminants such as lead, mercury, copper, arsenic, and cadmium can seep into your tap water through aging municipal pipes or natural groundwater sources. Knowing how to install a heavy metal filter gives you full control over your household water safety. Specialized heavy metal filtration systems utilize KDF media, activated carbon blocks, or catalytic filtration cartridges to capture hazardous ions before they reach your faucet.
Essential Tools and Materials Needed
Before beginning the installation, gather all necessary equipment:
- Heavy metal filter housing and certified replacement cartridge (KDF or Catalytic Carbon)
- Adjustable wrench and slip-joint pliers
- Pipe cutter or hacksaw (for copper lines)
- Teflon plumber's tape
- Push-fit connections or compression fittings
- Mounting bracket with mounting screws
- Shutoff valve and flexible braided water supply hoses
- Bucket and microfiber towels for catching minor spills
Step-by-Step Guide: How to Install a Heavy Metal Filter Under Sink
Installing a point-of-use filtration system under your kitchen sink is the most direct way to eliminate toxic ions from your drinking supply. Follow these precise instructions on how to install a heavy metal filter:
1. Prepare the Work Area and Shut Off Water
First, turn off the cold water shutoff valve located beneath your sink. Open the cold faucet handle to relieve residual line pressure and drain leftover water. Place a small bucket under the connection to catch remaining drips.
2. Mount the Filter Housing
Select a sturdy, accessible spot on the interior cabinet wall. Ensure there is at least 3 inches of clearance beneath the canister for convenient filter replacements in the future. Fasten the mounting bracket using screws and slide the filter assembly into position.
3. Connect the Water Supply Lines
Disconnect the existing cold water line from the shutoff valve. Apply Teflon tape clockwise to all male threaded connections. Attach a dedicated T-valve adapter to the cold supply line. Run a flexible hose from the supply adapter directly into the inlet port of your heavy metal filter unit.
4. Install the Filtered Outlet Line
Connect another high-pressure flexible tube from the filter’s outlet port to your primary faucet or dedicated drinking water dispenser tap. Make sure push-fit fittings are securely seated to prevent high-pressure leaks.
5. Flush and Test the System
Insert the heavy metal filter cartridge into the housing and tighten the collar firmly using a housing wrench. Slowly open the main water supply valve and check for leaks at all joints. Run cold water continuously for 10–15 minutes to purge loose carbon fines and trapped air pockets.
Tips for Long-Term Filter Maintenance
To keep your heavy metal filter operating at peak efficiency, replace the internal cartridge every 6 to 12 months depending on local water hardness and daily household consumption. Always inspect rubber O-rings during cartridge changes and apply food-grade silicone lubricant to maintain a watertight seal.
Professional Support & Maintenance
Need help maintaining or inspecting your plumbing system? For expert plumbing and heater services, visit our trusted team at Water-heater-repair Al Buteen to keep your entire water setup functioning smoothly and safely year-round.
 water filtration, heavy metal filter, plumbing guide, DIY plumbing
